Cluster Computing with VS Code
This post outlines how to set up Visual Studio Code (VS Code) for interactive development on a compute node of a computing cluster. This has several key advantages. Most importantly, it lets you develop using the convenience of your local machine but leveraging the superior computation resources of the computing cluster (i.e., far more memory, CPU cores, and/or a GPU). The best part about it? It’s super easy once set up!
The following is meant as a guide for the setup process and for establishing your first remote connection. The four steps discussed in this post are:
- Setting up VS Code and the SSH-Remote extension;
- Setting up SSH keys on the computing cluster;
- Initializing a compute node with the desired resources; and
- Connecting directly to the compute node with VS Code.
Examples focus on the slurm and PBS schedulers used by the computing clusters based at the University of Chicago, but the tutorial should be broadly applicable to many university computing servers using the slurm or PBS schedulers.
1. VS Code and SSH-Remote
To get started, download and install the appropriate version of VS Code for your system. You can find the download links here.
Next, install the VS Code extension Remote-SSH. You can do so directly within VS Code: Use the top-menu bar and navigate to File->Preferences->Extensions (or use Ctrl+Shift+X). Then search for Remote-SSH and install.
The Remote-SSH extension allows you to connect to a computing server directly from your local machine. Once the extension is installed, the bottom-left of your VS Code application will show a green box (“Open a Remote Window”). Clicking on it opens a dropdown menu (see the .gif), where you should select “Open SSH Configuration File…”. This will open a config file where you can specify the address of the computing cluster (HostName) as well as your username (User) and store them under a convenient name (Host). See the below snippet for the entries in my file for the Mercury and Acropolis computing clusters at UChicago.
Host mercury
  HostName mercury.chicagobooth.edu
  User wiemann

Host acropolis
  HostName acropolis.uchicago.edu
  User wiemann
Once the config file is updated, open a remote window by selecting “Connect to Host…” and selecting the desired server from the dropdown menu.
At this point, VS Code is likely asking for a password before admitting you to the cluster. The next section illustrates how this can be avoided in the future. For now, enter your password and wait for VS Code to establish the remote connection.
2. Setting up SSH Keys
When your connecting to the computing cluster in the above manner, you are using the Secure Shell (SSH) protocol. It is a widely used tool that provides users with a secure channel to a remote host. A key feature is its use of cryptographic keys to authenticate users for access to the remote server. We’ve not yet made explicit use of these keys and instead used password-based authentication. To connect to a compute node, however, setting up our SSH keys appropriately is a necessary step.
If you don’t yet have a public SSH key for your local machine (you may already be using one for publishing code on GitHub, for example), you need to initialize one. The process of doing so differs across operating systems. If you are using Windows, install the SSH client PuTTY and follow these instructions. Linux and Mac systems typically come with an SSH client preinstalled. Simply run the command ssh-keygen, which will store the keys in the ~/.ssh folder.
Once you have a public SSH key (on Linux/Mac: ~/.ssh/id_rsa.pub), copy it to the set of authorized keys on the computing cluster. Since you’ve already connected to the cluster in the previous step, simply navigate to the /.ssh folder on the computing cluster using the VS Code explorer (Crtl+Shift+E) and paste the content of your public key (from your local machine) to a new line of the file ~/.ssh/authorized_keys (on the computing cluster). Double-check that the pasted key begins with ssh-rsa.
To test whether the SSH keys have correctly been set up, close the remote connection in VS Code (e.g., by simply close the application), then restart VS Code and attempt to reconnect to the cluster. If the remote connection is established without password-authentication, you’re set!
3. Requesting Resources on Compute Nodes
So far, your connection to the computing server has been to the head node. The head node may be suitable for running tasks that require little resources. Since the resources of the head node are shared across all users, however, it is not good practice (and indeed not very nice) to use it for any coding sessions that require more computing power. To use the cluster for active development in settings where you want to leverage hardware exceeding that of you own machine, it’s thus necessary to request allocation of a computing node to your account on the server. Allocated resources are not shared across users and hence can be utilized in good conscience.
Requesting an interactive session on a computing node is done via the terminal. The specific commands depend on the scheduler of the computing cluster. For example, the Mercury computing cluster uses slurm. The below code snippet requests a session with four CPU cores, 32 GB of memory, and one GPU. See the Mercury documentation for additional options on how to request an interactive session (link).
# Start an interactive session with a GPU on Mercury
srun --account=phd --cpus-per-task=4 --mem-per-cpu=8G --partition=gpu --gres=gpu:1 --pty bash -l
The Acropolis computing cluster uses the PBS scheduler instead. The below snippet request a session with 28 computing threads, and 60 GB of memory. The important bit here is the -I option. Requests of resources are the same as you would usually specify in your PBS-submission files.
# Start an interactive session with 16 threads on Acropolis
qsub -I -l nodes=1:ppn=28,mem=60gb -j oe
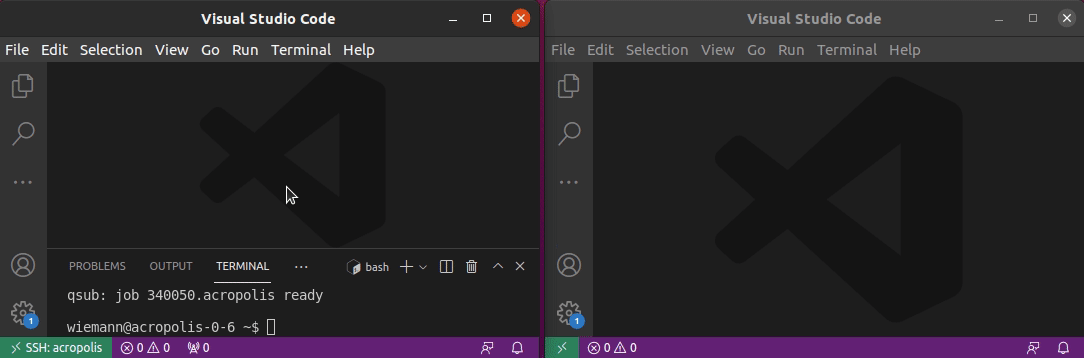
Submit whichever command is suitable for the computing cluster you’re using via the terminal in your remotely connected VS Code and wait until the resources have been allocated (that can take a few seconds: see the .gif in real time). You should notice a change in the name of the node that you are connected to. For example, while the terminal read wiemann@acropolis ~$ after initially connecting to the Acropolis cluster, it changed to wiemann@acropolis-0-6 ~$ after requesting an interactive session via the above command.
Next, you can start loading modules onto the session as you would when submitting jobs non-interactively. To see the list of available modules, run the command module avail in the terminal. For example, to load Python 3.6 on the Acropolis cluster, you can submit the following command on the terminal: module load python/3.6.1. (If you’re frequently using the same modules, editing you .profile file is a good idea.)
At this point, you could already utilize the compute node by simply running commands from your terminal (or parsing them to the terminal). But that would not be an enjoyable experience: Among its many downsides is the inability for your VS Code session to access the environment variables. The reason for this is that while your terminal is now connected to the compute node, your VS Code session still rests on the head node of the cluster (so that variables are not shared).
To fix this issue, VS Code needs to directly connect to the compute node. The next section illustrates how this can be achieved.
4. Connection to a Compute Node with VS Code
Unlike the head node of the computing cluster – to which you can connect directly via SSH – the compute nodes of the cluster (generally) don’t have a direct connection to the internet. For VS Code to connect to a computing node, it’s therefore necessary to “go through” the head node. This is done via a proxy connection.
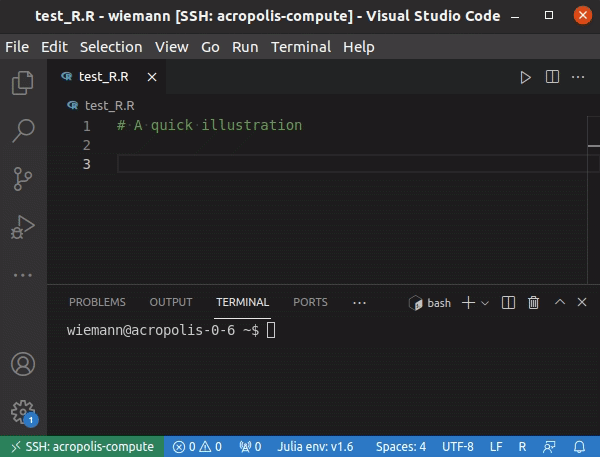
First, check the exact name of the compute node that you have requested. In the previous example on Acropolis, the name of the compute node is acropolis-0-6 ~$.
Second, add a new host to the config file that you’ve set-up in Section 1. Here, HostName is the name of the compute node (which may change across sessions) and ProxyJump specifies the address of the head node. Notice that I have set up a host called acropolis in Section 1.
Host acropolis-compute
  HostName acropolis-0-6
  ProxyJump acropolis
  User wiemann
Third, start a new VS Code session and connect to a remote host via the Remote-SSH extension as before. Select the address of the newly specified host (in my case acropolis-compute) and wait for the connection to establish.
You’re almost done! As a last step, install any VS Code extensions that you may want to utilize.
You can now use VS Code to code interactively on a compute node. Of course, next time around, you won’t have to jump through all these hoops again. You only have to repeat Section 3 (request resources on the cluster) and ensure that the name of the compute node that is allocated to your account matches the HostName in your config file from Section 4.
Last but not least: Big thanks to Ed Jee for first putting the Remote-SSH extension on my radar!